Difference between revisions of "Doozer-CNC-Machine"
| Line 99: | Line 99: | ||
== Project Status == |
== Project Status == |
||
| + | |||
| ⚫ | |||
| + | |||
| ⚫ | |||
<div style="border:1px solid #E8E8D8; background: #ffff88; color: #333333; width: 50%; padding: 1em; margin-bottom: 1em; box-shadow: 3px 3px 5px #cccccc; "> |
<div style="border:1px solid #E8E8D8; background: #ffff88; color: #333333; width: 50%; padding: 1em; margin-bottom: 1em; box-shadow: 3px 3px 5px #cccccc; "> |
||
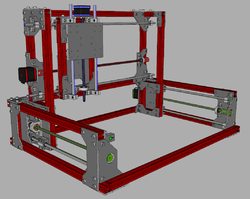
| + | [[File:2020-1-16-Doozer_Mk2.png|right|250px]]After days of near constant slaving away at the 3d modelling software, I now have a blueprint going forward. l also have some parts counts that I can look at... and it's not an entirely pretty picture. 50 custom mounting brackets. Thankfully many of them are reused 2, 4, even 10 times, so there's only 18 unique bracket shapes. 348 metric screws, which breaks down to over 250 M5s in 4 lengths, and nearly 100 M3s in 3 lengths. I placed a parts order on AliExpress for the screws and a spare Arduino CNC kit... just in case I earn the Level II Blue Smoke Metric Badge. |
||
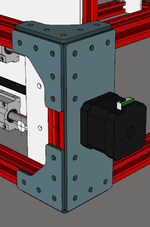
| ⚫ | [[File:2020-01-05-Doozer_Mk2.png|left|150px]]Progress in SketchUp is going really well. The bracket designs are starting to take shape. I'm assuming that they'll be made of 1/8" thick (~3mm) aluminum plate. Overall I'm fairly pleased with the project as it's coming along, though in watching other people's projects on YouTube, I certainly do have my doubts. Each of the 3 axis is basically resting on four linear bearings, each held in place with four m3 screws. I've done my best to make their stance as square as possible for maximum rigidity, but I still have my concerns. |
||
| + | The next phase in this project, aside from waiting over a month for overpriced machine screws from China (and trust me, they were the cheapest I could find!) is to begin cutting out the brackets. Original plans were to 3D print a set of them first for putting the machine together for proving.. and honestly, that's still an option for a lot of them. I may start putting some of the odd-colored filaments at my house to work on the smaller, large quantity brackets. Other brackets I will either use the big CNC table at the shop to mill out of 'plex' (whatever scrap acrylic, plexiglas, or whatever I can find), or to ideally make use of a laser cutter. |
||
| ⚫ | At the end of the day, it's all going to be made of metal, mostly aluminum extrusion with steel rods. While the machine will hopefully be capable of occasional milling of aluminum, the 'router' will still be a Dremel. The Doozer's more common use will be for milling materials that are much less resistant: Acrylic, ABS/PVC/Polystyrene Sheet, MDF, Pressboard, Veneer, and Balsa Wood. |
||
| ⚫ | |||
| + | Once the proving set of brackets is done, I can see if adjustments need to be made. I'll also be able to start trying to bring the machine to life. |
||
| ⚫ | |||
| + | |||
| ⚫ | |||
| + | |||
| + | Known elements still to be done: |
||
| + | |||
| + | *Tool Mounting Plate |
||
| + | *: I have located a couple of aluminum chunks that may be able to be milled into a permanent mounting block for tools. This has been set aside for future use. |
||
| + | |||
| + | *Work Surface |
||
| + | *: This will be made out of 2525 aluminum extrusion.. and while I have a fair amount, I don't have huge quantities. The final design of how this will work is still on-hold, pending some more practical forward progress. There is a possible future where this extrusion ideal is abandoned, and replaced with a couple sheets of MDF and some standard SAE threaded plywood anchors. |
||
| + | |||
| + | *Deflector Shields |
||
| + | *: Simple angled plates for keeping sawdust from fouling the Y axis screws. Mountings for these will be designed once the Work Surface is sorted out. |
||
| + | |||
| ⚫ | |||
== Project Development History == |
== Project Development History == |
||
| Line 115: | Line 131: | ||
<div class="mw-collapsible mw-collapsed" id="mw-customcollapsible-projectdevelopment"> |
<div class="mw-collapsible mw-collapsed" id="mw-customcollapsible-projectdevelopment"> |
||
<div style="border:1px solid #E8E8E8; background: #eeeeee; color: #333333; width: 50%; padding: 1em; margin-bottom: 1em; box-shadow: 3px 3px 5px #cccccc; "> |
<div style="border:1px solid #E8E8E8; background: #eeeeee; color: #333333; width: 50%; padding: 1em; margin-bottom: 1em; box-shadow: 3px 3px 5px #cccccc; "> |
||
| + | |||
| + | === 1/5/2020 === |
||
| + | |||
| ⚫ | [[File:2020-01-05-Doozer_Mk2.png|left|150px]]Progress in SketchUp is going really well. The bracket designs are starting to take shape. I'm assuming that they'll be made of 1/8" thick (~3mm) aluminum plate. Overall I'm fairly pleased with the project as it's coming along, though in watching other people's projects on YouTube, I certainly do have my doubts. Each of the 3 axis is basically resting on four linear bearings, each held in place with four m3 screws. I've done my best to make their stance as square as possible for maximum rigidity, but I still have my concerns. |
||
| + | |||
| ⚫ | At the end of the day, it's all going to be made of metal, mostly aluminum extrusion with steel rods. While the machine will hopefully be capable of occasional milling of aluminum, the 'router' will still be a Dremel. The Doozer's more common use will be for milling materials that are much less resistant: Acrylic, ABS/PVC/Polystyrene Sheet, MDF, Pressboard, Veneer, and Balsa Wood. |
||
=== 01/03/2020 === |
=== 01/03/2020 === |
||
Revision as of 17:59, 16 January 2020

| Yellow Tag Tool |
| Contact Owner Before Using |
| Tool Owner: Karen Englebeck |
| Chat: @zebragrrl on on Slack |
| Email: See sticker on machine. |
test
🚨 This is an ongoing project, tool is not functional yet 🚨
Project Objectives
Project Status
01/16/2020 - Latest!
The next phase in this project, aside from waiting over a month for overpriced machine screws from China (and trust me, they were the cheapest I could find!) is to begin cutting out the brackets. Original plans were to 3D print a set of them first for putting the machine together for proving.. and honestly, that's still an option for a lot of them. I may start putting some of the odd-colored filaments at my house to work on the smaller, large quantity brackets. Other brackets I will either use the big CNC table at the shop to mill out of 'plex' (whatever scrap acrylic, plexiglas, or whatever I can find), or to ideally make use of a laser cutter.
Once the proving set of brackets is done, I can see if adjustments need to be made. I'll also be able to start trying to bring the machine to life.
Known elements still to be done:
- Tool Mounting Plate
- I have located a couple of aluminum chunks that may be able to be milled into a permanent mounting block for tools. This has been set aside for future use.
- Work Surface
- This will be made out of 2525 aluminum extrusion.. and while I have a fair amount, I don't have huge quantities. The final design of how this will work is still on-hold, pending some more practical forward progress. There is a possible future where this extrusion ideal is abandoned, and replaced with a couple sheets of MDF and some standard SAE threaded plywood anchors.
- Deflector Shields
- Simple angled plates for keeping sawdust from fouling the Y axis screws. Mountings for these will be designed once the Work Surface is sorted out.
Project Development History
1/5/2020
Progress in SketchUp is going really well. The bracket designs are starting to take shape. I'm assuming that they'll be made of 1/8" thick (~3mm) aluminum plate. Overall I'm fairly pleased with the project as it's coming along, though in watching other people's projects on YouTube, I certainly do have my doubts. Each of the 3 axis is basically resting on four linear bearings, each held in place with four m3 screws. I've done my best to make their stance as square as possible for maximum rigidity, but I still have my concerns.At the end of the day, it's all going to be made of metal, mostly aluminum extrusion with steel rods. While the machine will hopefully be capable of occasional milling of aluminum, the 'router' will still be a Dremel. The Doozer's more common use will be for milling materials that are much less resistant: Acrylic, ABS/PVC/Polystyrene Sheet, MDF, Pressboard, Veneer, and Balsa Wood.
01/03/2020
I had the opportunity to speak with Keith Legg on New Years Eve, in regards to machining some of the needed custom brackets for the linear rod , motor, and threaded rod bearing mounts. That part of the equation is a resounding GO.
This evening I re-inventoried my box of previously acquired components.. motors, rods, screws, and so on.. and I’m looking forward to returning to the design process with renewed enthusiasm. Looking forward to beginning finalizing the design, so I can finally begin BUILDING.
Soon, I hope!
09/20/2019
Email received from AliExpress. All components of the targeting laser assembly ( crosshair & dot lasers and USB power adapter ) are now in the hands of couriers in the USA.
Beata donated a 2-port USB power converter to the project after I'd ordered the single-USB version, so I may utilize the dual-port unit instead (one for each laser)
09/18/2019
All off-the-shelf structural components have been purchased, and have arrived. All components are measured and 3D modelled in SketchUp Make 2016. The 3 axis assemblies have been assembled in SketchUp.
Currently developing a modified 3D model of the tolerances of the aluminum extrusions, that model will help me easily create functional 3D-printed parts that fit properly.
Maximum workspace dimensions seem to be coming in at (305mm x 250mm x 180mm), which is approximately (12in x 11in x 7in). These are the maximum lengths that the linear rails and bearings can accommodate. I suspect these lengths will reduce somewhat as the actual gantry is designed.
What even is a ‛Doozer’?
The Doozers are a race of characters from Jim Henson's Fraggle Rock television series. Doozers love to work all day long. They're tiny, green creatures who usually sport construction helmets, boots, and tool belts. Doozers stand approximately knee-high to Fraggles, at six inches tall.
When compared to the other races within Fraggle Rock, they are by far the most technologically advanced. Most Doozers are construction workers, while others are architects or miners. With the help of various Doozer machines and vehicles, they build elaborate constructions all over Fraggle Rock, like towers, buildings, roads and bridges. Doozer constructions are the Fraggles' favorite snack, and they love to eat the buildings that the Doozers build. The Doozers don't mind their buildings being eaten -- if the Fraggles didn't eat the constructions, the Doozers would run out of building space!
