Difference between revisions of "Doozer-CNC-Machine"
| (60 intermediate revisions by the same user not shown) | |||
| Line 3: | Line 3: | ||
<div style="width:197px; float: right; margin-left: 20px; padding: 10px; border: 1px solid #aaaaaa; background-color: #e8e8e8;"> |
<div style="width:197px; float: right; margin-left: 20px; padding: 10px; border: 1px solid #aaaaaa; background-color: #e8e8e8;"> |
||
| + | <!-- Begin Project Graphic--> |
||
| − | [[File:Project_Doozer_Patch.png |link=|center]] |
||
| + | [[File:Project_Doozer_Patch.png |link=|center|197px]] |
||
| + | <!-- End Project Graphic--> |
||
| + | <!-- Begin yellow tag --> |
||
| − | <div style="border: 1px solid #aaaaaa; background-color: #EEFF55; padding: .5em; border-radius: .5em;"> |
||
| + | <!-- |
||
| + | <div style="border: 1px solid #aaaaaa; border-radius: .5em; text-align: center; width:197px; display: inline-block; background-color: #eeff77;"> |
||
{| style="width: 100%; text-align: center; border: 0px; padding: 0px; margin: 0px;" |
{| style="width: 100%; text-align: center; border: 0px; padding: 0px; margin: 0px;" |
||
| − | | style="text-align: center; font-size: 1.25em; padding-bottom: none;" | '''Yellow |
+ | | style="text-align: center; font-size: 1.25em; padding-bottom: none;" | '''Yellow Tag Tool''' |
|- |
|- |
||
| − | | style="text-align: center; font-size: . |
+ | | style="text-align: center; font-size: .875em; padding-top: -.5em;" | '''Contact Owner Before Using''' |
|} |
|} |
||
</div> |
</div> |
||
| + | --> |
||
| − | |||
| + | <!-- End yellow tag --> |
||
| − | {| class="wikitable" style="width: 100%;font-size: .85em; strdetch: semi-condensed;" |
||
| + | <!-- Begin Owner Info --> |
||
| − | | '''Tool Owner:''' [[User:Zebragrrl]] |
||
| + | <!-- |
||
| + | {| class="wikitable" style="width: 100%; border-collapse: collapse; font-size: .85em; strdetch: semi-condensed;" |
||
| + | | '''Tool Owner:''' 👤 [[User:Zebragrrl]] |
||
|- |
|- |
||
| '''Chat:''' <u>@zebragrrl</u> on [https://join.slack.com/t/eugenemakerspace/shared_invite/enQtMjA0NjM5OTc4NjU3LWNjY2FmYzdjM2JiZWJhYzY1MGEwODcwYjAzNjk4NDBlNGZkZmZjNDdkZjE3MzBlYmZmMzI4YmU4NDlmZTgwZWU on Slack] |
| '''Chat:''' <u>@zebragrrl</u> on [https://join.slack.com/t/eugenemakerspace/shared_invite/enQtMjA0NjM5OTc4NjU3LWNjY2FmYzdjM2JiZWJhYzY1MGEwODcwYjAzNjk4NDBlNGZkZmZjNDdkZjE3MzBlYmZmMzI4YmU4NDlmZTgwZWU on Slack] |
||
| Line 23: | Line 30: | ||
|- |
|- |
||
|} |
|} |
||
| + | --> |
||
| − | |||
| + | <!-- End Owner Info --> |
||
| + | <!-- Begin Sidebar Content Box --> |
||
| + | <!-- |
||
<div style="border-top: 1px solid #aaaaaa; border-bottom: 1px solid #aaaaaa; margin: 10px 0px; padding: .5em 0em;"> |
<div style="border-top: 1px solid #aaaaaa; border-bottom: 1px solid #aaaaaa; margin: 10px 0px; padding: .5em 0em;"> |
||
| − | |||
| − | test |
||
</div> |
</div> |
||
| + | --> |
||
| + | <!-- End Sidebar Content Box --> |
||
</div> |
</div> |
||
<!-- End of Sidebar --> |
<!-- End of Sidebar --> |
||
| Line 35: | Line 45: | ||
<div style="margin-right: 237px; margin-top: 0.5em; border: 1px solid black; text-align: center; background: repeating-linear-gradient(134.8deg, #ffcc00, #ffcc00 20px, #555555 20px, #555555 40px);"> |
<div style="margin-right: 237px; margin-top: 0.5em; border: 1px solid black; text-align: center; background: repeating-linear-gradient(134.8deg, #ffcc00, #ffcc00 20px, #555555 20px, #555555 40px);"> |
||
| − | <span style="border: 1px solid black; background: white; padding: 4px 10px;"> 🚨 '''This |
+ | <span style="border: 1px solid black; background: white; padding: 4px 10px;"> 🚨 '''This is an ongoing project, tool is not functional yet''' 🚨 </span> |
| + | </div> |
||
| + | |||
| + | '''''The Doozer CNC Gantry''''' is a custom built CNC tool platform, essentially a computer controlled robot that can use a variety of attached tools following computer instructions. Most commonly envisioned for use with an attached WEN 2347 Variable Speed Rotary Tool, to act as a 'desktop' scale CNC milling machine; the Doozer CNC has been designed with modular expandability in mind, allowing it to utilize a variety of cutting, marking, and other tools to create a work platform that can perform a fair number of computer controlled tasks. The Doozer CNC was designed and built by 👤 [[User:Zebragrrl]]. |
||
| + | |||
| + | == Project Objectives == |
||
| + | <div style="overflow: hidden"> |
||
| + | [[file:Clipboard.jpg|left|200px]] |
||
| + | {| |
||
| + | | |
||
| + | The following is the list of design goals and hoped-for features. |
||
| + | |||
| + | === Primary Objectives === |
||
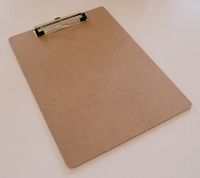
| + | * Build a CNC machine capable of milling acrylic or pressboard - the standard backing board of the ubiquitous inexpensive clipboard. |
||
| + | * Build the machine using mostly salvaged and found parts. |
||
| + | * Machine should operate using a standard Arduino Uno board, with the standard CNC expansion board kit. |
||
| + | * Workflow should be possible from [[file:Bookmark-icon.png|link=|text-top]] [https://www.inventables.com/technologies/easel Inventables Easel] to [[file:Bookmark-icon.png|link=|text-top]] [https://winder.github.io/ugs_website/ Universal Gcode Sender]. |
||
| + | * Purchased parts should ideally be the cheapest available. |
||
| + | * Machine should have interchangeable tool functionality, so the gantry can be used to utilize a number of different tools. Those tools potentially could include: |
||
| + | ** [[file:yt-icon.png|link=|text-top]] [https://www.youtube.com/watch?v=239aFAqYBpQ Dremel Carver] (or inexpensive WEN alternative) - possibly mounting the tool-end of the Flexible-Shaft attachment, to reduce machine vibration. |
||
| + | ** [[file:Bookmark-icon.png|link=|text-top]] [https://inkstitch.org/tutorials/embroidery-machine/ Embroidery Hoop] on extension arm, allowing a minimally modified sewing machine to create embroidered patches. |
||
| + | **: May be better as a secondary machine. |
||
| + | ** [[file:yt-icon.png|link=|text-top]] [https://www.youtube.com/watch?v=YqvgA1P5hWg Free-Rotating 'Drag Knife'] or inexpensive [[file:Amazon-icon.png|link=|text-top]] [https://www.amazon.com/s?k=cb09+blade+for+silhouette+cameo+2 Vinyl Cutter replacement blade] cartridges. |
||
| + | ** [[file:yt-icon.png|link=|text-top]] [https://www.youtube.com/watch?v=NEyL6cVWlo4 Filament Extruder and Hot-End] for 3D printing, or [[file:yt-icon.png|link=|text-top]] [https://www.youtube.com/watch?v=NJuO4nUAkiA modified 3D Pen] |
||
| + | **: May require secondary Arduino pre-configured as 3D printer instead of CNC. Possibly could use a serial port switchbox to switch arduinos, usb, etc?? |
||
| + | ** [[file:yt-icon.png|link=|text-top]] [https://www.youtube.com/watch?v=TUa4VkFSzLk Inexpensive soldering iron] with copper wire to replace tip, for cutting foam. |
||
| + | ** [[file:yt-icon.png|link=|text-top]] [https://www.youtube.com/watch?v=yDkm5kARPws Reciprocating needle cutter] for cutting cardboard or foam-core. |
||
| + | ** [[file:yt-icon.png|link=|text-top]] [https://www.youtube.com/watch?v=0DXx_QfcODE Pen or Pencil holder] for use as plotter. [[file:yt-icon.png|link=|text-top]] [https://www.youtube.com/watch?v=1sVdGG8-RKk Uses Part 1] [[file:yt-icon.png|link=|text-top]] [https://www.youtube.com/watch?v=rH6HD1M_Qb4 Uses Part 2] [[file:yt-icon.png|link=|text-top]] [https://www.youtube.com/watch?v=h3vjhNnHTSw Uses Part 3] |
||
| + | *** Fabric markers for making t-shirts/wall hangings, paint markers or metallic sharpies for marking surfaces like glass, mirrors, tile, and chalkboards. |
||
| + | *** [[file:yt-icon.png|link=|text-top]] [https://youtu.be/L_87au4vtmA?t=756 Custom fabric holder frame] to maintain consistent line quality on fabrics |
||
| + | *** [[file:Bookmark-icon.png|link=|text-top]] [http://www.bloomize.com/diy-embossing-ball-point-pen/ Glue pen] for heat embossing |
||
| + | *** [[file:yt-icon.png|link=|text-top]] [https://www.youtube.com/watch?v=eg_OY5Q9wgk Ball-point pen without ink], for use as pressure embosser/creasing tool. |
||
| + | ** [[file:yt-icon.png|link=|text-top]] [https://www.youtube.com/watch?v=WPjHpUH9Zic Cutting Laser] - at a later date, as funding permits |
||
| + | |||
| + | === Secondary Objectives === |
||
| + | * Clamping area should be able to accommodate a standard 9" x 12.5" clipboard, with the clip removed, whether or not it can mill that entire area. |
||
| + | |||
| + | === Tertiary Objectives === |
||
| + | * The footprint of the completed machine should not exceed 12.5" x 16.5" (to fit inside folding cart for easy transport) |
||
| + | |||
| + | === Postliminary Objectives=== |
||
| + | '''''Creeping Featuritis''''' |
||
| + | |||
| + | It's nearly inevitable when any suitably complicated project drags on, or even goes on hiatus. Eventually you're going to start daydreaming new ideas and features for the build. The Doozer was no exception to this. The trick is to try to make sure that the feature creep is actually a reasonable addition that can be missed out if need be, due to budget or skill constraints. The following is a lits of ideas that cropped up along the way, that made the cut. |
||
| + | |||
| + | * Redesign machine to use aluminum extrusion for the major structural elements |
||
| + | * Upgrade to using actual lead screws and aluminum shaft-to-motor couplers from the start - not 'later date' upgrades |
||
| + | * All parts created components should be either copies of purchaseable replacements, or be capable of being made WITH the machine. |
||
| + | * Slotted waste-board that allows carriage bolts to travel in the aluminum extrusion below, for clamping materials down with wingnuts. |
||
| + | * Waste board slats should also be possible to make/replace WITH the machine! |
||
| + | * Laser Crosshair built into the X Axis to allow for 'same every time' axis zeroing, and thus repeatable jobs. |
||
| + | * [[file:Bookmark-icon.png|link=|text-top]] [http://dbugslife.blogspot.com/2014/04/poor-mans-mach3-pendant.html USB 10-key number-pad] for use as a [[file:Bookmark-icon.png|link=|text-top]] [https://www.thingiverse.com/thing:3540024 remote positioning/control pendant] for the CNC. |
||
| + | |||
| + | |} |
||
</div> |
</div> |
||
== Project Status == |
== Project Status == |
||
| − | All off-the-shelf components have been purchased, and have arrived. All components are measured and 3D modelled in SketchUp Make 2016. The 3 axis assemblies have been assembled in SketchUp. |
||
| − | Currently developing a modified 3D model of the tolerances of the aluminum extrusions, that model will help me easily create functional 3D-printed parts that fit properly. |
||
| + | === 02/17/2023 - COVID, Medical Breaks, and the big freeze === |
||
| − | Maximum workspace dimensions seem to be coming in at (305mm x 250mm x 180mm), which is approximately (12in x 11in x 7in). These are the maximum lengths that the linear rails and bearings can accommodate. I suspect these lengths will reduce somewhat as the actual gantry is designed. |
||
| + | <div style="border:1px solid #E8E8D8; background: #ffff88; color: #333333; width: 50%; padding: 1em; margin-bottom: 1em; box-shadow: 3px 3px 5px #cccccc; "> |
||
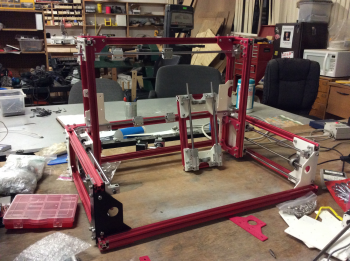
| + | [[File:2020-09-10-Doozer-Mk2.png|right|350px]] Things had finally started to come into a decent shape around November 2020 (See photo). The Gantry frame was assembled, and I was able to move it using the screws. In assembling it, some of the bearings were inadvertently damaged, and the need to order replacements, and the poor quality of the replacements when they finally arrived, provided the impetus for a cascading series of delays and excuses. |
||
| + | COVID hadn't just affected shipping times and product quality from China, it had introduced a lot of limitations on social interaction, and since we had to limit access to the shop to a certain number of people at a time, I saw it as a chance to make space for others, and I took myself home and worked on 3D printing for a while. By 2022, in a world 'getting over' COVID, I began to lament for simpler times when I would spend a day at the shop working on the Doozer. Sadly, having had surgery in late 2022, the post-surgery restrictions made returning to the shop a non-option. But almost as soon as those restrictions were lifted, I was informed that I'd be going in for surgery again, just a few weeks later. |
||
| − | ---- |
||
| + | Knowing my time was limited, I made a trip down to the shop, and packed all the motors and electronics home with me... figuring that if I can get the Arduino, Motors, and so on working during my convalescence, maybe I can come back stronger to this project, ready to take on the next steps. And it's something I should be able to work on at the kitchen table. |
||
| + | I was again a bit in awe of the machine as I took inventory of all the parts and components, the surprising scale of the thing, and it's overall structure. This really has come a long way from just a doodle. |
||
| − | == Project Development History == |
||
| + | The Doozer isn't dead yet! |
||
| − | <div style="text-align: center;" class="mw-customtoggle-projectdevelopment">⮟ <u>Click here to expand section</u> ⮟</div> |
||
| + | </div> |
||
| + | == Development notes (this section is in flux) == |
||
| + | |||
| + | <div style="text-align: center;" class="mw-customtoggle-devnotes">⬇ <u>Click here to expand section</u> ⬇</div> |
||
| + | <div class="mw-collapsible mw-collapsed" id="mw-customcollapsible-devnotes"> |
||
| + | |||
| + | * [[file:yt-icon.png|link=|text-top]] [https://www.youtube.com/watch?v=OfyT1xTZC6o JUST WATCH THIS FIRST!!!!!!!!!] |
||
| + | * [[file:yt-icon.png|link=|text-top]] [https://youtu.be/K0XfRPi_h2M?t=677 How to determine motor coil pair wires] |
||
| + | * [[file:yt-icon.png|link=|text-top]] [https://youtu.be/1ioctbN9JV8?t=250 Installing GRBL on the Arduino (WITHOUT CNC HAT!)] |
||
| + | * [[file:Bookmark-icon.png|link=|text-top]] [https://github.com/synthetos/grblShield/wiki/Using-grblShield Tutorial Page for grblShield] see [[file:yt-icon.png|link=|text-top]] [https://youtu.be/1ioctbN9JV8?t=322 this video] for more |
||
| + | * [[file:yt-icon.png|link=|text-top]] [https://youtu.be/1ioctbN9JV8?t=516 Tuning and making the steppers turn! (using UGS)] |
||
| + | |||
| + | * [[file:yt-icon.png|link=|text-top]] |
||
| + | |||
| + | * [[file:yt-icon.png|link=|text-top]] |
||
| + | |||
| + | </div> |
||
| + | |||
| + | ---- |
||
| + | |||
| + | == Project Development History == |
||
| + | <div style="text-align: center;" class="mw-customtoggle-projectdevelopment">⬇ <u>Click here to expand section</u> ⬇</div> |
||
<div class="mw-collapsible mw-collapsed" id="mw-customcollapsible-projectdevelopment"> |
<div class="mw-collapsible mw-collapsed" id="mw-customcollapsible-projectdevelopment"> |
||
| + | <div style="border:1px solid #E8E8E8; background: #eeeeee; color: #333333; width: 50%; padding: 1em; margin-bottom: 1em; box-shadow: 3px 3px 5px #cccccc; "> |
||
| + | === 07/15/2020=== |
||
| − | Hidden text is revealed! |
||
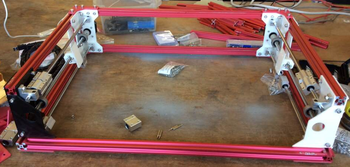
| + | [[File:2020-7-15-Doozer-Mk2.png|right|350px]] '''Starting to look like something''' |
||
| + | Second Y-Axis track (right side) has been assembled. The new T-nut holders work like a charm. |
||
| + | |||
| + | Looking at the assembly process, it seems likely that I'll need to disassemble the Y axis assemblies at some point, in order to attach the gantry. I decided to work backwards and start by assembling the X-axis traveler and Z-axis carriage. |
||
| + | |||
| + | Drilled out the threads on the first four bearing blocks. (3 out of every 4 screw holes need to be drilled out to allow free-spinning of a long M4 bolt. The 4th hole in each remains un-drilled so that the original tapped threads can be used from the reverse side. Found a few places where the brackets needed to be modified. Original brackets were modeled on the mistaken belief that the bearing blocks used M3 screws.. rather than M4. |
||
| + | |||
| + | Unfortunately in working to assemble the components, it was discovered that the package of M4 T-nuts I had ordered, actually contained M3 T-nuts. (I have so many now!) |
||
| + | |||
| + | I placed an order on Amazon for M4 t-nuts, and for an assortment box of M4 bolts and M4 hex nuts (of which I had none!) Project returns to hold state until those parts can arrive. (Expected Delivery by 7/21) |
||
| + | |||
| + | Starting to realize how little structural assembly remains, and how close the project is to progressing to the electronics stage. Still, there is the Tool-mounting assembly, and the actual work-surface to be designed and implemented, but I am definitely getting close to the point where the mechanical portion of the machine will be completed, and it will be time to start figuring out how to make the thing move.😳 |
||
| + | |||
| + | === 07/10/2020 === |
||
| + | |||
| + | [[File:2020-7-10-Doozer Mk2.jpg|right|250px]] '''MAJOR progress has been made!''' |
||
| + | |||
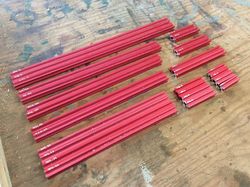
| + | '''''On 6/29/2020''''', I ventured down to the makerspace, and put in a solid day's work finally chopping the aluminum extrusion into the required lengths, making good use of the [[file:Bookmark-icon.png|link=|text-top]] [https://www.kurraglenindustries.com.au/linear-cutting-list-calculator.htm Kurraglen Industries Linear Cutting List Calculator] |
||
| + | |||
| + | I utilized the Harbor Freight compound mitre saw, with the installed wood-cutting blade, and experienced no issues with cutting through the aluminum extrusion. The only issues I encountered were due to missing clamps. |
||
| + | |||
| + | I attempted to assemble a few pieces utilizing the brackets I already had. The 3D printed PLA brackets worked like a charm, but the lasercut acrylic brackets shattered under the mechanical stress created by the V-slots in the aluminum extrusion. |
||
| + | |||
| + | [[File:2020-7-10-Doozer Mk2-02.jpg|left|250px]] '''''On 7/7/2020''''', armed with a slew of freshly 3D printed brackets provided by Ben Hallert, I returned to the shop to begin some more assembly work. |
||
| + | |||
| + | A full 8 hours later, I had a mostly assembled Y-Axis (the left one). In the process of assembling it, I discovered that my design for the "T-Nut" holder brackets needed reworking. After a bit of redesign work later that evening, the files were sent off to Ben for printing. Within a couple of days, the new parts were dropped off. |
||
| + | |||
| + | While the amount of assembly work that lays ahead of me can be quite daunting, I can say that I'm excitedly looking forward to the next time I'm able to head down to the shop to work on this project! |
||
| + | |||
| + | In the meantime I've begun collecting video tutorials on the electronics portion of the project. While I'm not 'there' yet, I know it's looming on the horizon. |
||
| + | |||
| + | === 06/26/2020 === |
||
| + | Bits were ordered for milling new brackets using the shop's CNC. With the shop's lasers temporarily out of commission, this represented the only option for stronger brackets within my reach, without outsourcing. An attempt was made at milling a bracket out of aluminum using the shop's CNC. Unfortunately, the bit began slipping halfway through the job (my fault), and the job had to be halted. Having lost confidence in the idea, I cleaned up and unbolted the aluminum plate from the waste-board, effectively rendering that part unusable. |
||
| + | |||
| + | HDPE remains an option in the future, though COVID-19 has changed a lot of things. |
||
| + | |||
| + | Shipping from China has become intolerably slow. It was slow before, but it's a matter of months between ordering and receiving now. As thicker brackets will require longer screws, I will probably go forward with the brackets I have, and attempt to build a usable machine, then consider upgrading the brackets... even if it's just a matter of farming out 3D prints to those with larger printers. The laser cutters may again return to functionality, in which case, that's another option to consider. |
||
| + | |||
| + | The very very last of the ordered parts from AliExpress, however, have finally arrived. So all components are present now. |
||
| + | |||
| + | It is time to start plotting out the lengths of the aluminum extrusion segments that need to be cut. |
||
| + | |||
| + | === 01/31/2020 === |
||
| + | All 26 of the brackets that would fit on the 4.7"x4.7" bed of my 3D printer have now been printed. The shop's laser-cutter did indeed become operational, and with some uneven pacing, I have been able to now laser-cut 11 of the larger brackets out of 3mm acrylic sheet. This leaves 4 that Ben has offered to 3D print for me, and then 11 more brackets to be cut. I may undertake to get some more of these punched out over the weekend, or early next week. |
||
| + | |||
| + | AliExpress parts have been trickling in slowly. Chinese New Year has again ground much of the sellers' operations to a halt, and shipments which already take weeks, tend to take a few more weeks. |
||
| + | |||
| + | I'm not entirely confident in the resiliency of the brackets that I have thus far. I know that things will change when I add bolts and aluminum extrusion and other rigid components.. but I still have my concerns about the longterm viability. I do still hope to have aluminum replacement brackets.. either made by my machine, or on the shop's CNC machine(s), or by farming the job out.. but at ~50 brackets.. it's no small ask for anyone. Failing this, I am keeping the idea in mind of milling a full set of (albeit thicker) brackets using Polypropylene or HDPE/Polyethylene cutting-board material, which I know can be milled with the big CNC table at the shop. But that would be an added expense. |
||
| + | |||
| + | For now, it's mostly a waiting game. Waiting for nuts, screws, and washers.. as well as a few various and sundry bits and bobs that remain on order. |
||
| + | |||
| + | I am, however, getting undeniably close to the point where I'll have to start cutting aluminum. |
||
| + | |||
| + | === 01/16/2020 === |
||
| + | [[File:2020-1-16-Doozer_Mk2.png|right|250px]]After days of near constant slaving away at the 3d modelling software, I now have a blueprint going forward. l also have some parts counts that I can look at... and it's not an entirely pretty picture. 50 custom mounting brackets. Thankfully many of them are reused 2, 4, even 10 times, so there's only 18 unique bracket shapes. 348 metric screws, which breaks down to over 250 M5s in 4 lengths, and nearly 100 M3s in 3 lengths. I placed a parts order on AliExpress for the screws and a spare Arduino CNC kit... just in case I earn the Level II Blue Smoke Metric Badge. |
||
| + | |||
| + | The next phase in this project, aside from waiting over a month for overpriced machine screws from China (and trust me, they were the cheapest I could find!) is to begin cutting out the brackets. Original plans were to 3D print a set of them first for putting the machine together for proving.. and honestly, that's still an option for a lot of them. I may start putting some of the odd-colored filaments at my house to work on the smaller, large quantity brackets. Other brackets I will either use the big CNC table at the shop to mill out of 'plex' (whatever scrap acrylic, plexiglas, or whatever I can find), or to ideally make use of a laser cutter. |
||
| + | |||
| + | Once the proving set of brackets is done, I can see if adjustments need to be made. I'll also be able to start trying to bring the machine to life. |
||
| + | |||
| + | Known elements still to be done: |
||
| + | |||
| + | *Tool Mounting Plate |
||
| + | *: I have located a couple of aluminum chunks that may be able to be milled into a permanent mounting block for tools. This has been set aside for future use. |
||
| + | |||
| + | *Work Surface |
||
| + | *: This will be made out of 2525 aluminum extrusion.. and while I have a fair amount, I don't have huge quantities. The final design of how this will work is still on-hold, pending some more practical forward progress. There is a possible future where this extrusion ideal is abandoned, and replaced with a couple sheets of MDF and some standard SAE threaded plywood anchors. |
||
| + | |||
| + | *Deflector Shields |
||
| + | *: Simple angled plates for keeping sawdust from fouling the Y axis screws. Mountings for these will be designed once the Work Surface is sorted out. |
||
| + | |||
| + | === 01/05/2020 === |
||
| + | [[File:2020-01-05-Doozer_Mk2.png|left|150px]]Progress in SketchUp is going really well. The bracket designs are starting to take shape. I'm assuming that they'll be made of 1/8" thick (~3mm) aluminum plate. Overall I'm fairly pleased with the project as it's coming along, though in watching other people's projects on YouTube, I certainly do have my doubts. Each of the 3 axis is basically resting on four linear bearings, each held in place with four m3 screws. I've done my best to make their stance as square as possible for maximum rigidity, but I still have my concerns. |
||
| + | |||
| + | At the end of the day, it's all going to be made of metal, mostly aluminum extrusion with steel rods. While the machine will hopefully be capable of occasional milling of aluminum, the 'router' will still be a Dremel. The Doozer's more common use will be for milling materials that are much less resistant: Acrylic, ABS/PVC/Polystyrene Sheet, MDF, Pressboard, Veneer, and Balsa Wood. |
||
| + | |||
| + | === 01/03/2020 === |
||
| + | I had the opportunity to speak with Keith Legg on New Years Eve, in regards to machining some of the needed custom brackets for the linear rod , motor, and threaded rod bearing mounts. That part of the equation is a resounding GO. |
||
| + | |||
| + | This evening I re-inventoried my box of previously acquired components.. motors, rods, screws, and so on.. and I’m looking forward to returning to the design process with renewed enthusiasm. Looking forward to beginning finalizing the design, so I can finally begin BUILDING. |
||
| + | |||
| + | Soon, I hope! |
||
| + | |||
| + | === 09/20/2019 === |
||
| + | Email received from AliExpress. All components of the targeting laser assembly ( [https://www.aliexpress.com/item/32761071886.html crosshair & dot lasers] and [https://www.aliexpress.com/item/32995600500.html USB power adapter] ) are now in the hands of couriers in the USA. |
||
| + | |||
| + | Beata donated a 2-port USB power converter to the project after I'd ordered the single-USB version, so I may utilize the dual-port unit instead (one for each laser) |
||
| + | |||
| + | === 09/18/2019 === |
||
| + | All off-the-shelf structural components have been purchased, and have arrived. All components are measured and 3D modelled in SketchUp Make 2016. The 3 axis assemblies have been assembled in SketchUp. |
||
| + | |||
| + | Currently developing a modified 3D model of the tolerances of the aluminum extrusions, that model will help me easily create functional 3D-printed parts that fit properly. |
||
| + | |||
| + | Maximum workspace dimensions seem to be coming in at (305mm x 250mm x 180mm), which is approximately (12in x 11in x 7in). These are the maximum lengths that the linear rails and bearings can accommodate. I suspect these lengths will reduce somewhat as the actual gantry is designed. |
||
| + | |||
| + | </div> |
||
</div> |
</div> |
||
---- |
---- |
||
| − | == What is a |
+ | == What even is a ‛Doozer’? == |
| − | <div style="text-align: center;" class="mw-customtoggle-whatisadoozer"> |
+ | <div style="text-align: center;" class="mw-customtoggle-whatisadoozer">⬇ <u>Click here to expand section</u> ⬇</div> |
<div class="mw-collapsible mw-collapsed" id="mw-customcollapsible-whatisadoozer"> |
<div class="mw-collapsible mw-collapsed" id="mw-customcollapsible-whatisadoozer"> |
||
| − | [[File:Doozer-funko-pop.png|left|thumb|107px|<span style="font-size:. |
+ | [[File:Doozer-funko-pop.png|left|thumb|107px|<span style="font-size:.875em;font-stretch:semi-condensed;">Funko Pop Doozer</span>]] |
| − | [[File:Doozers-and-fraggles.jpg|right|thumb|210px|<span style="font-size:. |
+ | [[File:Doozers-and-fraggles.jpg|right|thumb|210px|<span style="font-size:.875em;font-stretch:semi-condensed;">Fraggles and Doozers</span>]] |
| − | [https://muppet.fandom.com/wiki/Doozers The Doozers] are a race of characters from |
+ | [https://muppet.fandom.com/wiki/Doozers The Doozers] are a race of characters from Jim Henson's [https://muppet.fandom.com/wiki/Fraggle_Rock ''Fraggle Rock''] television series. Doozers love to work all day long. They're tiny, green creatures who usually sport construction helmets, boots, and tool belts. Doozers stand approximately knee-high to [https://muppet.fandom.com/wiki/Fraggles Fraggles], at six inches tall. |
When compared to the other races within Fraggle Rock, they are by far the most technologically advanced. Most Doozers are construction workers, while others are architects or miners. With the help of various Doozer machines and vehicles, they build elaborate constructions all over Fraggle Rock, like towers, buildings, roads and bridges. Doozer constructions are the Fraggles' favorite snack, and they love to eat the buildings that the Doozers build. The Doozers don't mind their buildings being eaten -- if the Fraggles didn't eat the constructions, the Doozers would run out of building space! |
When compared to the other races within Fraggle Rock, they are by far the most technologically advanced. Most Doozers are construction workers, while others are architects or miners. With the help of various Doozer machines and vehicles, they build elaborate constructions all over Fraggle Rock, like towers, buildings, roads and bridges. Doozer constructions are the Fraggles' favorite snack, and they love to eat the buildings that the Doozers build. The Doozers don't mind their buildings being eaten -- if the Fraggles didn't eat the constructions, the Doozers would run out of building space! |
||
Latest revision as of 07:05, 18 February 2023
🚨 This is an ongoing project, tool is not functional yet 🚨
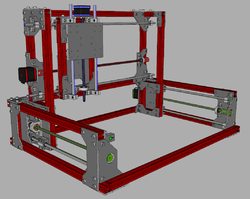
The Doozer CNC Gantry is a custom built CNC tool platform, essentially a computer controlled robot that can use a variety of attached tools following computer instructions. Most commonly envisioned for use with an attached WEN 2347 Variable Speed Rotary Tool, to act as a 'desktop' scale CNC milling machine; the Doozer CNC has been designed with modular expandability in mind, allowing it to utilize a variety of cutting, marking, and other tools to create a work platform that can perform a fair number of computer controlled tasks. The Doozer CNC was designed and built by 👤 Karen Englebeck.
Project Objectives
Project Status
02/17/2023 - COVID, Medical Breaks, and the big freeze
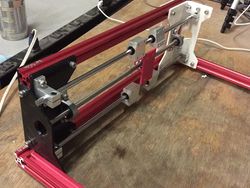
COVID hadn't just affected shipping times and product quality from China, it had introduced a lot of limitations on social interaction, and since we had to limit access to the shop to a certain number of people at a time, I saw it as a chance to make space for others, and I took myself home and worked on 3D printing for a while. By 2022, in a world 'getting over' COVID, I began to lament for simpler times when I would spend a day at the shop working on the Doozer. Sadly, having had surgery in late 2022, the post-surgery restrictions made returning to the shop a non-option. But almost as soon as those restrictions were lifted, I was informed that I'd be going in for surgery again, just a few weeks later.
Knowing my time was limited, I made a trip down to the shop, and packed all the motors and electronics home with me... figuring that if I can get the Arduino, Motors, and so on working during my convalescence, maybe I can come back stronger to this project, ready to take on the next steps. And it's something I should be able to work on at the kitchen table.
I was again a bit in awe of the machine as I took inventory of all the parts and components, the surprising scale of the thing, and it's overall structure. This really has come a long way from just a doodle.
The Doozer isn't dead yet!
