(→Process Overview:: added final steps) |
No edit summary |
||
| Line 17: | Line 17: | ||
** Material onto Waste Board |
** Material onto Waste Board |
||
** Install Appropriate Mill end (bit) |
** Install Appropriate Mill end (bit) |
||
| − | * Launch Software |
+ | * Launch UGS Software |
** Reset Zero as safety |
** Reset Zero as safety |
||
** Load .nc file |
** Load .nc file |
||
| Line 32: | Line 32: | ||
** Stay in shop & keep an eye on the CNC table |
** Stay in shop & keep an eye on the CNC table |
||
*** take this time to help clean & organize the shop :D |
*** take this time to help clean & organize the shop :D |
||
| − | * |
+ | * Warp up |
| + | ** Clean up CNC area |
||
** Remove project |
** Remove project |
||
| − | ** vacuum |
+ | ** vacuum area |
** Reset CNC for next user |
** Reset CNC for next user |
||
| − | == |
+ | ==Design your project== |
| + | (stem) |
||
| − | |||
| − | == |
+ | ==Setup Table== |
| + | (stem) |
||
| + | ==Launch UGS Software== |
||
This is the software that takes your gcode file and feeds it to the router line by line in a way that it will understand it. |
This is the software that takes your gcode file and feeds it to the router line by line in a way that it will understand it. |
||
Launch UGS by double clicking this icon: |
Launch UGS by double clicking this icon: |
||
| Line 48: | Line 51: | ||
<br> |
<br> |
||
[[File:2024 08 launch window.jpg|450px]] |
[[File:2024 08 launch window.jpg|450px]] |
||
| + | (stem) |
||
| − | |||
| + | ==Run project== |
||
| − | |||
| + | (stem) |
||
| − | |||
| + | ==Wrap Up== |
||
| − | |||
| + | (stem) |
||
Revision as of 07:00, 6 August 2024
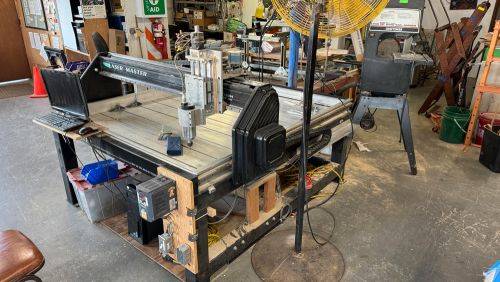
These are our collection of notes on the Laser CNC Master Restoration Project.
Specs:
- Make: Cam Tech
- Model: LaserMaster CM155
- Year:
- Working Area: X?, Y?, Z~6"
Process Overview:
- Design your project in Easel (or still untested, Carbide Create)
- Export gcode file as .nc
- Setup Table
- Waste Board
- Material onto Waste Board
- Install Appropriate Mill end (bit)
- Launch UGS Software
- Reset Zero as safety
- Load .nc file
- Confirm dims with visualizer
- Move router into position
- Reset Zero For reals this time
- Create Drill locating hole
- Return to Ideal Zero
- Run project
- Try is in the air first
- Try it with cheap material second
- google appropriate speeds & feeds
- Try it with your final material
- Stay in shop & keep an eye on the CNC table
- take this time to help clean & organize the shop :D
- Warp up
- Clean up CNC area
- Remove project
- vacuum area
- Reset CNC for next user
Design your project
(stem)
Setup Table
(stem)
Launch UGS Software
This is the software that takes your gcode file and feeds it to the router line by line in a way that it will understand it.
Launch UGS by double clicking this icon:

Run project
(stem)
Wrap Up
(stem)
Links:
- https://www.youtube.com/watch?v=XOcqlAb7ZLM
- https://www.youtube.com/watch?v=UU80JLGsEAs
- https://www.youtube.com/watch?v=bCUHsJ4Ktj0
- -
- http://www.sawmillcreek.org/showthread.php?125009-Camtech-LaserMaster-Users
- http://www.dataworks.gr/old/uk/products/specif.htm
- http://www.cnczone.com/forums/commercial-cnc-wood-routers/172133-cnc.html
- http://www.laserform.ca/pdf/CAMTECH_brochure_email.pdf
- LaserCut 5.x Archive
- http://www.co2-lasers.com/blog/wp-content/uploads/2012/10/MPC6535-Software.rar
- Our Copy: MPC6535-Software.rar
- Note that if you extract this under Linux you will get many duplicate file names. Presumably, these are the 32, and 64 bit system files.
- Hardware Manual: MPC6535-Hardware_Manual.pdf
- Laser Manual: Operators_Manual_48_Series-1.pdf
- Software Manual: LaserCut5.3-Software_Manual-V1.6.pdf
-- Main.ClifCox - 11 May 2016
Status:
2024-08-05: It works!
NOTE: There are NO stop switches installed, so it will gladly tear through the bed, or really try hard to run itself off the rails if you let it. And if you are pinned between it and an edge, expect an emergency room visit at the least.
The X,Y& Z axis are moving. The Spindle control is working UGS works well with the system.
- tickle_pulse.zip: Arduino code for laser PWM with tickle pulse.


